
Get started
Clone this site
Start by cloning this site—this will save you a ton of time. You can easily see how this site is built, then all you need to do is copy and paste your own content into this template:
https://webflow.com/website/outseta-course
Create your Outseta account
You can sign up for a 7-day free trial of Outseta here:
Install Outseta script and links
Add Outseta's Quick Start Embed Script to the header of your site
Within Webflow, go to Project settings > Custom code. Copy and paste the Quick Start Embed Script that you'll find within your Outseta account on the Auth > Sign up and login page. Please note you'll need to make a slight modification to the script as shown below—this tells Outseta that you want to show links to pages of protected content (they are typically hidden by default).
Hook up your sign up, login, logout, and profile links
Go to Auth > Embeds within Outseta. On this page you can grab your sign up, login, profile, and logout links. Use the URLs provided for the corresponding buttons on your site. You can also grab them below, but remember, if you grab them here make sure you fill in your Outseta subdomain.
Sign up link
Login link
Profile link
Logout link
For the logout link, append this value to the end of any URL. We'll redirect the user the the URL you select when they logout.
Configure Outseta sign up and login settings
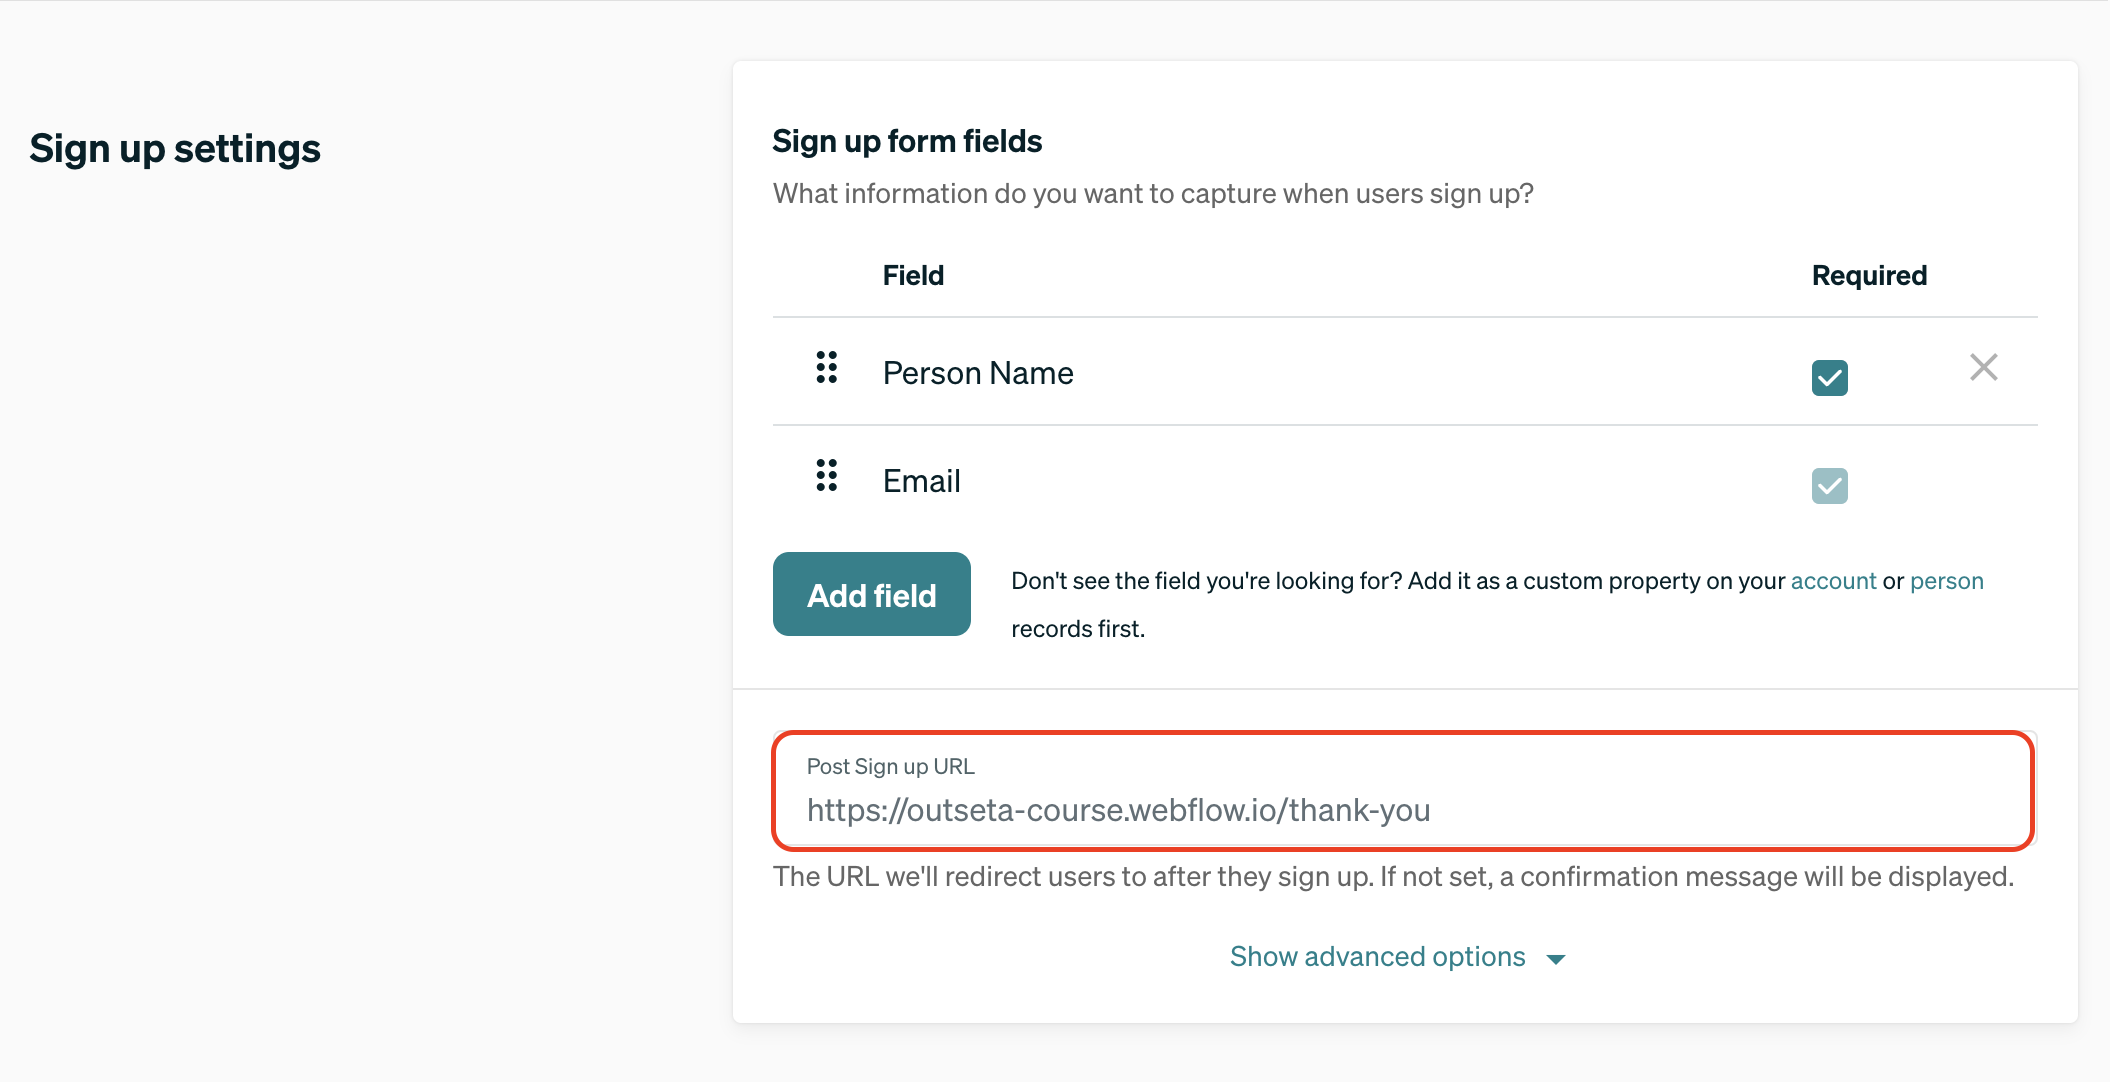
Set your Post Login URL and Post Sign Up URL
Go to Auth > Embeds within Outseta. Set your Post Login URL to your "Courses" page.

Set your Post Sign Up URL to your "Thank you" page. This is where users will be redirected immediately after they sign up. The "Thank you" page is typically a page that let's the user know they need to check their email to verify their account and login. We've included this page in this template.
Protect content
Set up protected content
In Outseta, go to Auth > Protected content. When you add protected content you'll need to pay attention to the following three fields:
Hidden URLs
This is how you set up which content on the site will be hidden from non-members. In this template, it makes sense to hide any URLs that start with lessons, since that's the collection URL for the individual video lessons. Anyone who is not a member won't be able to access them.
Access denied URL
If a user clicks through to a URL they don't have access to, they'll go to the "Access denied URL". In this template, we've made that the Sign up page.
Plans and add-ons with access to this group
This is pretty straightforward, but you'll choose which plans can access the protected content. In this example we only have one plan, and that plan gives users access to all of the courses on the site. But you could also set it up in a way that gives users access to specific courses based on their plan or plan add-ons.

Add mark as complete functionality (optional)
Add a custom property that will store completed lessons
In Outseta, go to CRM > Custom properties and go to the Person tab. Add a property and name it something that makes sense for your site, like "Completed Lessons" for example. You can keep the "Control type" as text.

Alter the script on the course videos template
In Webflow, go to the page settings for the Lessons Template CMS collection page. Scroll all the way down and you'll see some custom code has already been added for you. This script will give the "mark as complete" button on this page it's functionality. It looks like this.
The only thing you'll need to do here is alter the variable for storing completed lessons based on how you named the custom property in your Outseta account. In the script, we've used CompletedLessons. So just find any instance of CompletedLessons and replace it with the system name of your Outseta custom property.
Enable account-specific pages
In Outseta, go to Auth > Protected content and click the Account-specific pages tab. Enable this feature via the toggle. When you enable account-specific pages you'll need to pay attention to the following three fields that appear:
Specify a folder or a collection
This is where you account-specific pages will live on your site. In this template, it makes sense to hide any URLs that start with members, since that's the collection URL for the members.
Access denied URL
Just like when setting up content groups, if a user clicks through to an account-specific page they don't have access to, they'll go to the "Access denied URL". In this template, we've made that the Sign up page.
Send users to their page on login
If you'd like to automatically redirect users to an Account Specific Page when they login, just toggle this option on. If you have multiple account specific pages, Outseta will automatically send them to the page identified as "Account Specific Page URL 1."

Set up Webflow sync
In order to automatically create account-specific pages when a user signs up and make those pages more like a unique member dashboard, let's set up Webflow sync, an integration with Webflow that's built right into Outseta.
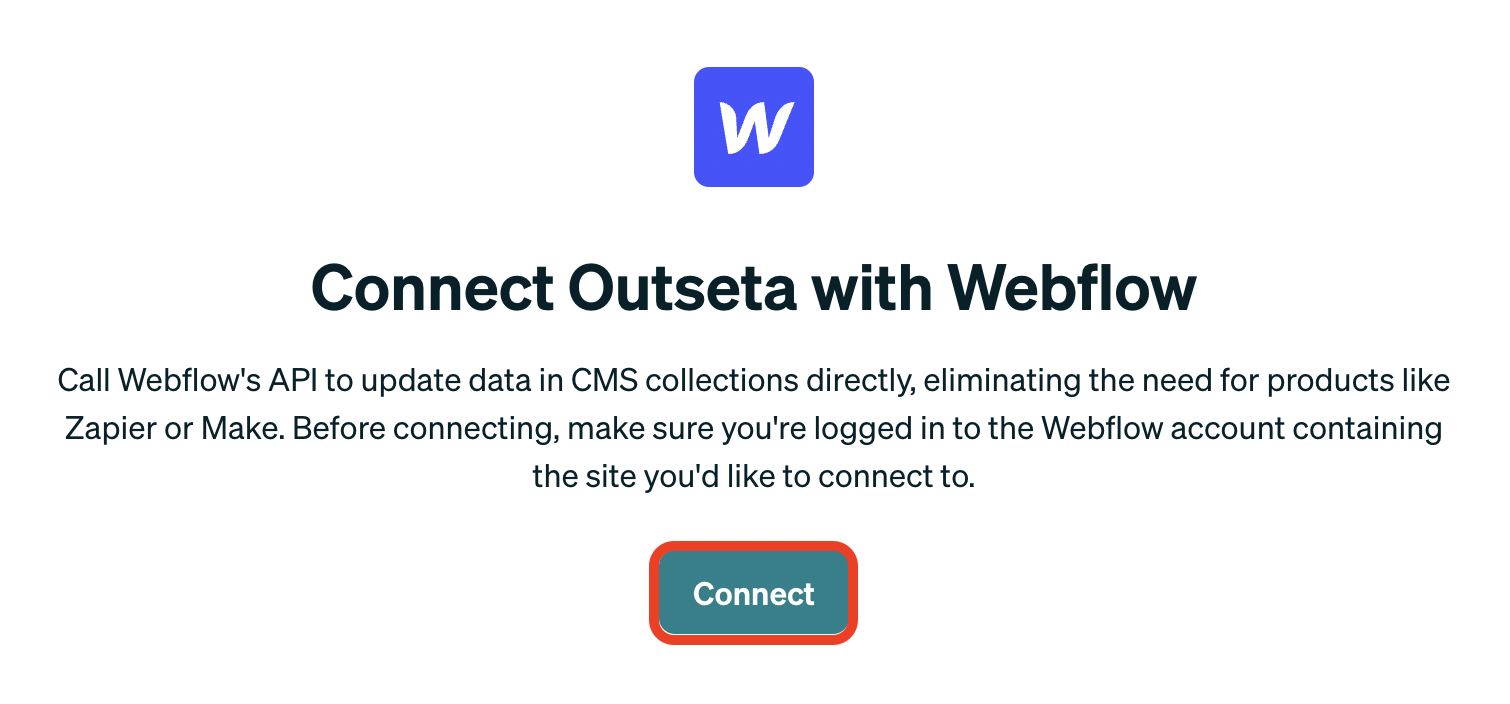
In Outseta, go to Settings > Integrations > Webflow. Make sure you are logged into your Webflow account, then click "Connect".
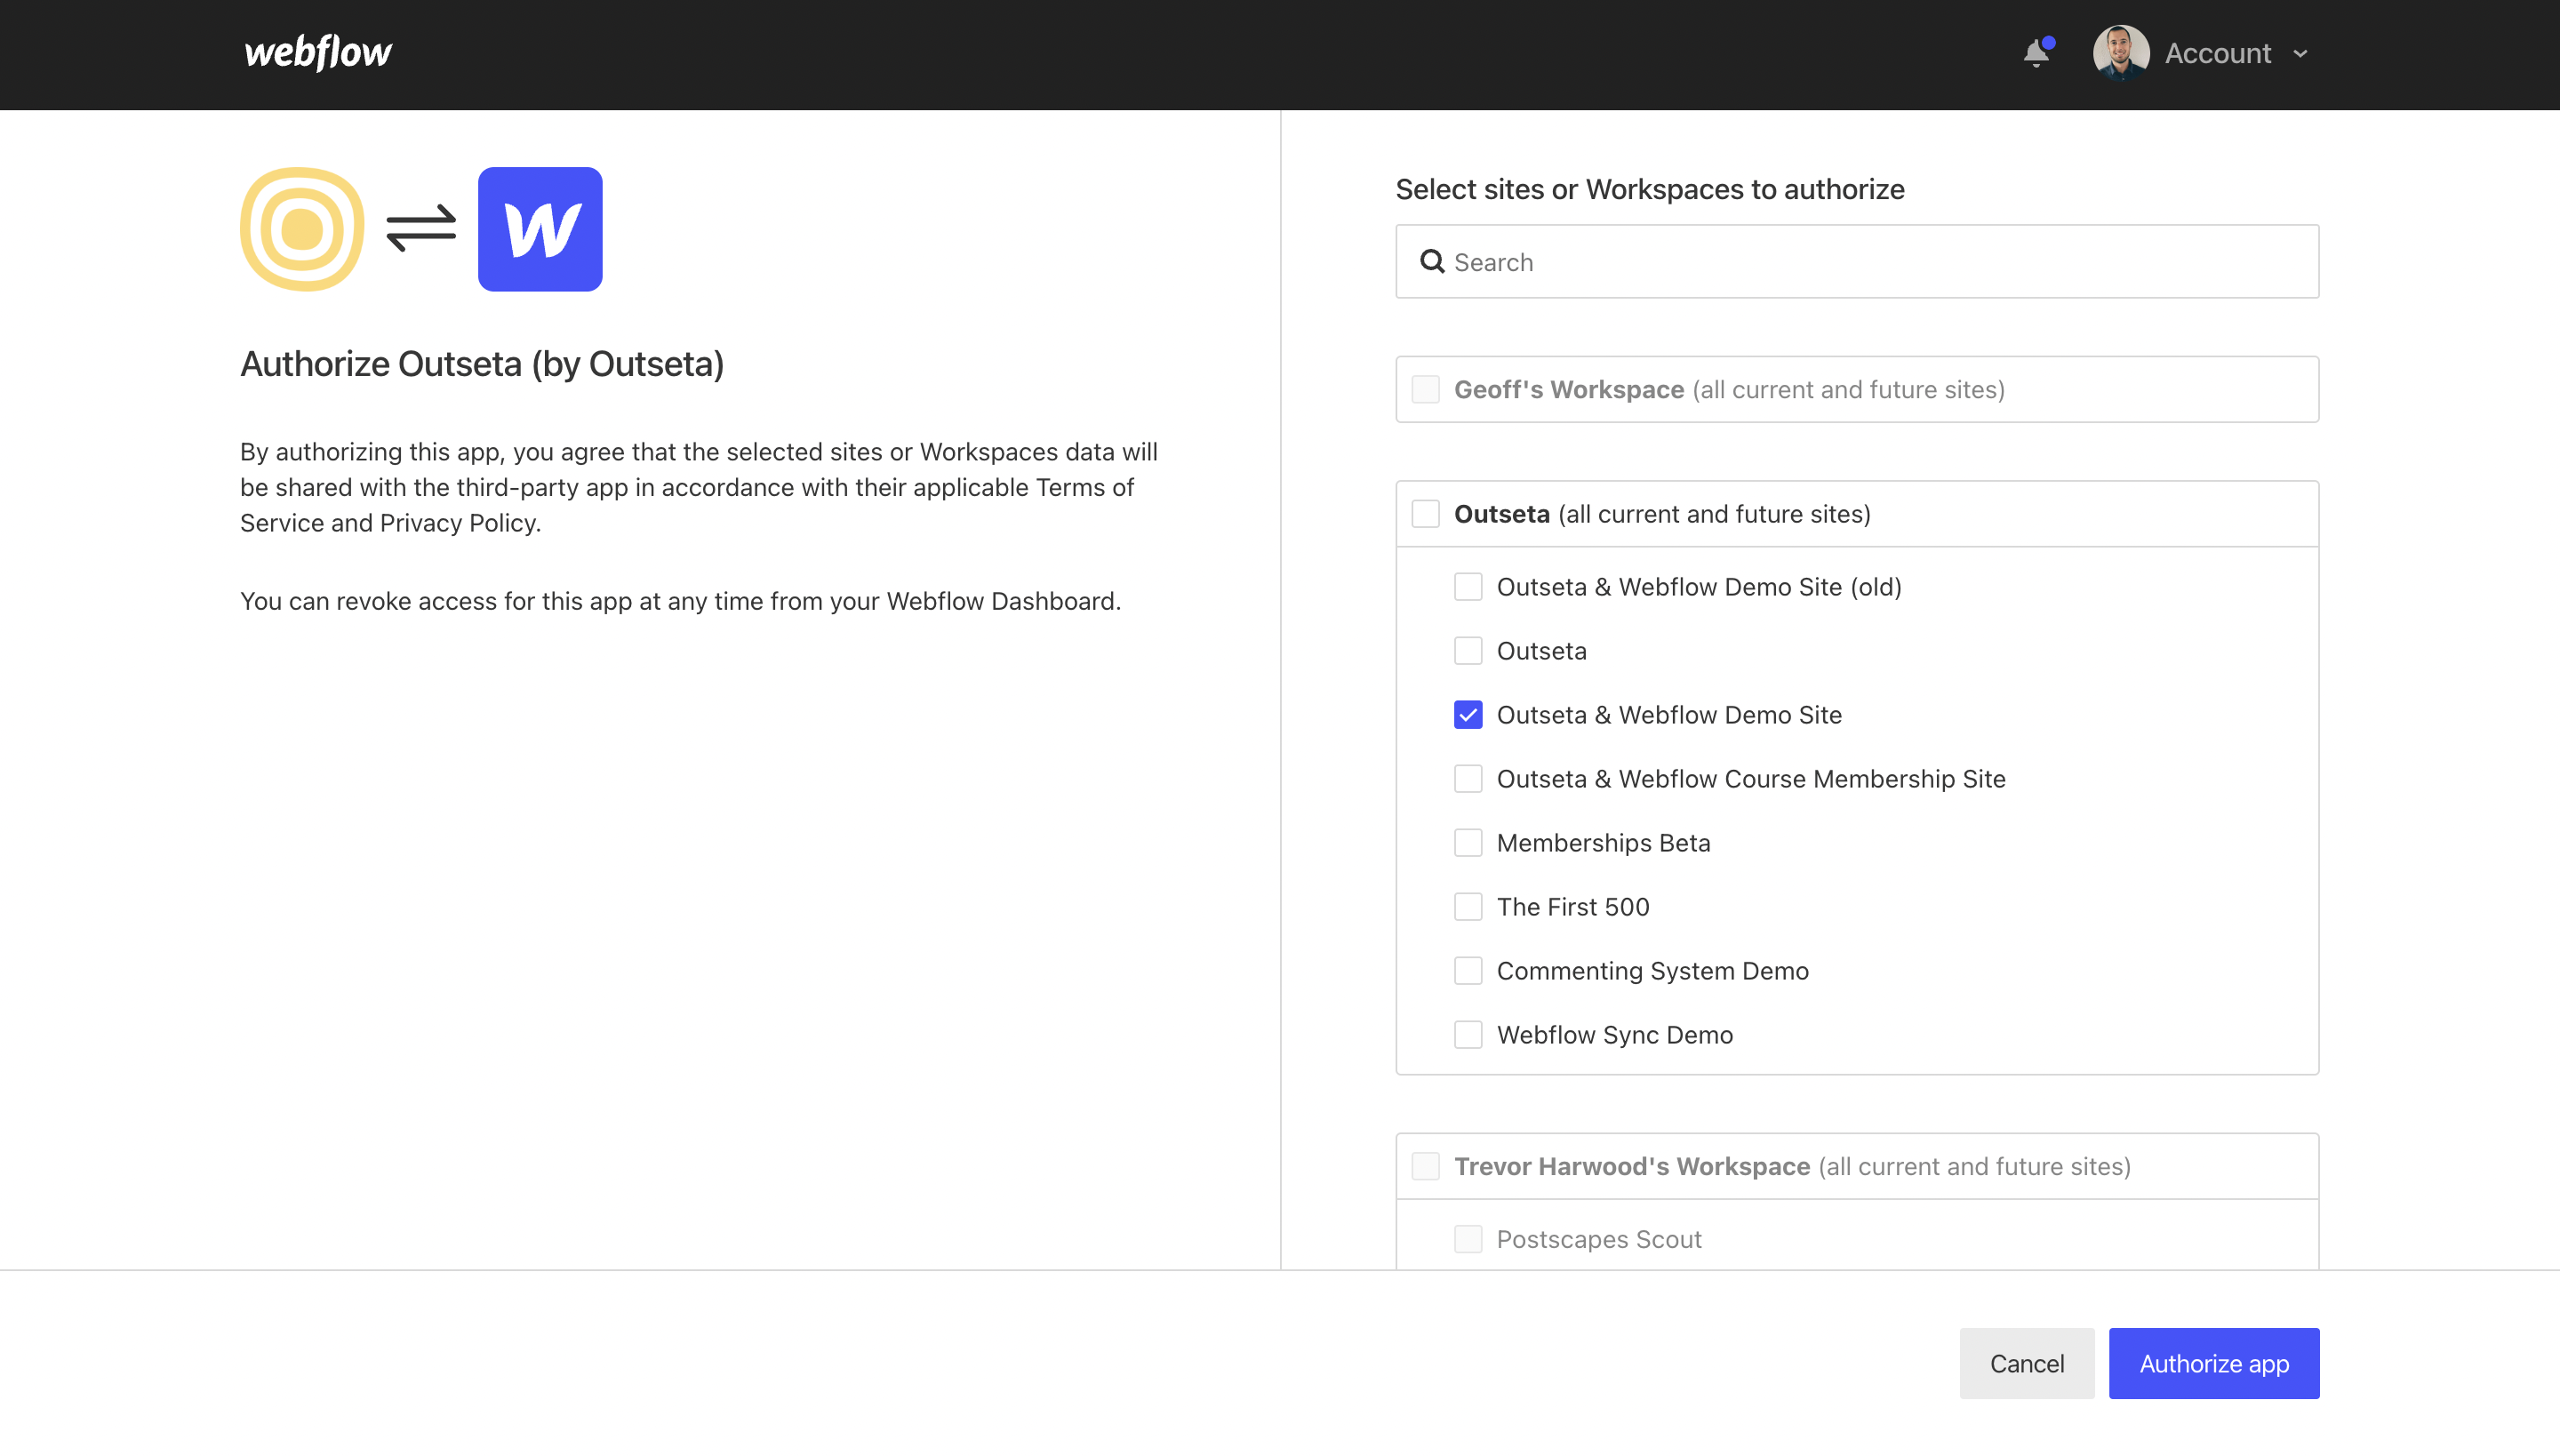
Select the Webflow site or workspace you want to connect to Outseta and click "Authorize app".
Next, choose your Webflow site and then map your account records in Outseta to a specific CMS collection in Webflow—this should be the same folder or collection specified when you enabled account-specific pages.

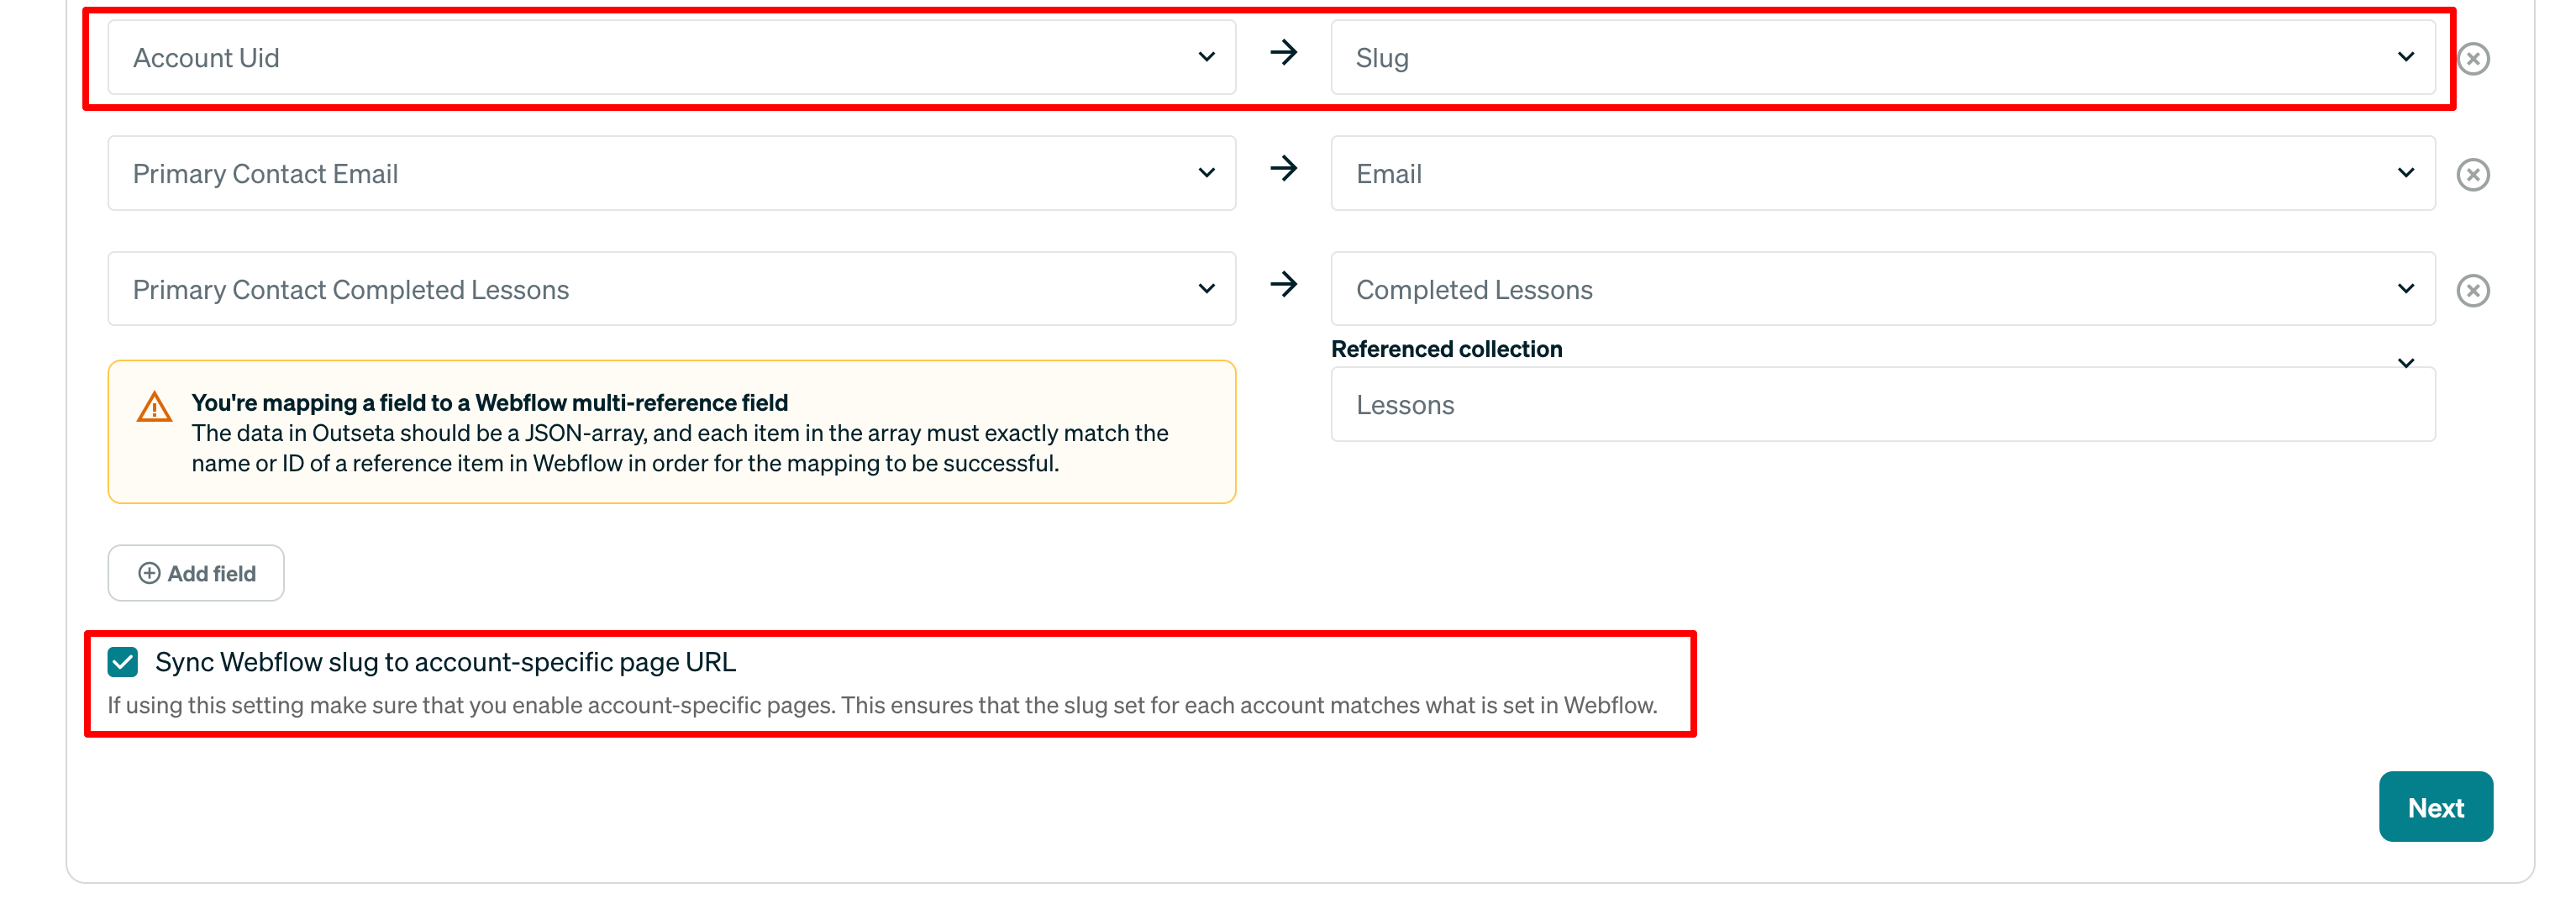
Map the fields on your account records in Outseta to fields on your CMS items in Webflow. This is your chance to bring data from Outseta into the Webflow CMS, including custom properties. If you remember the "mark as complete" functionality we set up before, you can now map the completed lessons custom property to a multi-reference field in your Webflow Members CMS collection in order to display a unique list of completed lessons to each user.

After mapping your fields, click the Sync Webflow slug to account-specific page URL toggle.

In the example below:
- The Account UID field in Outseta becomes the page Slug in Webflow. The resulting account specific page URL would be formatted as: https://yoursite.com/members/accountuid.
- The Slug from Webflow is then sent back to Outseta—this is important so that Outseta knows the URL of the account specific page.
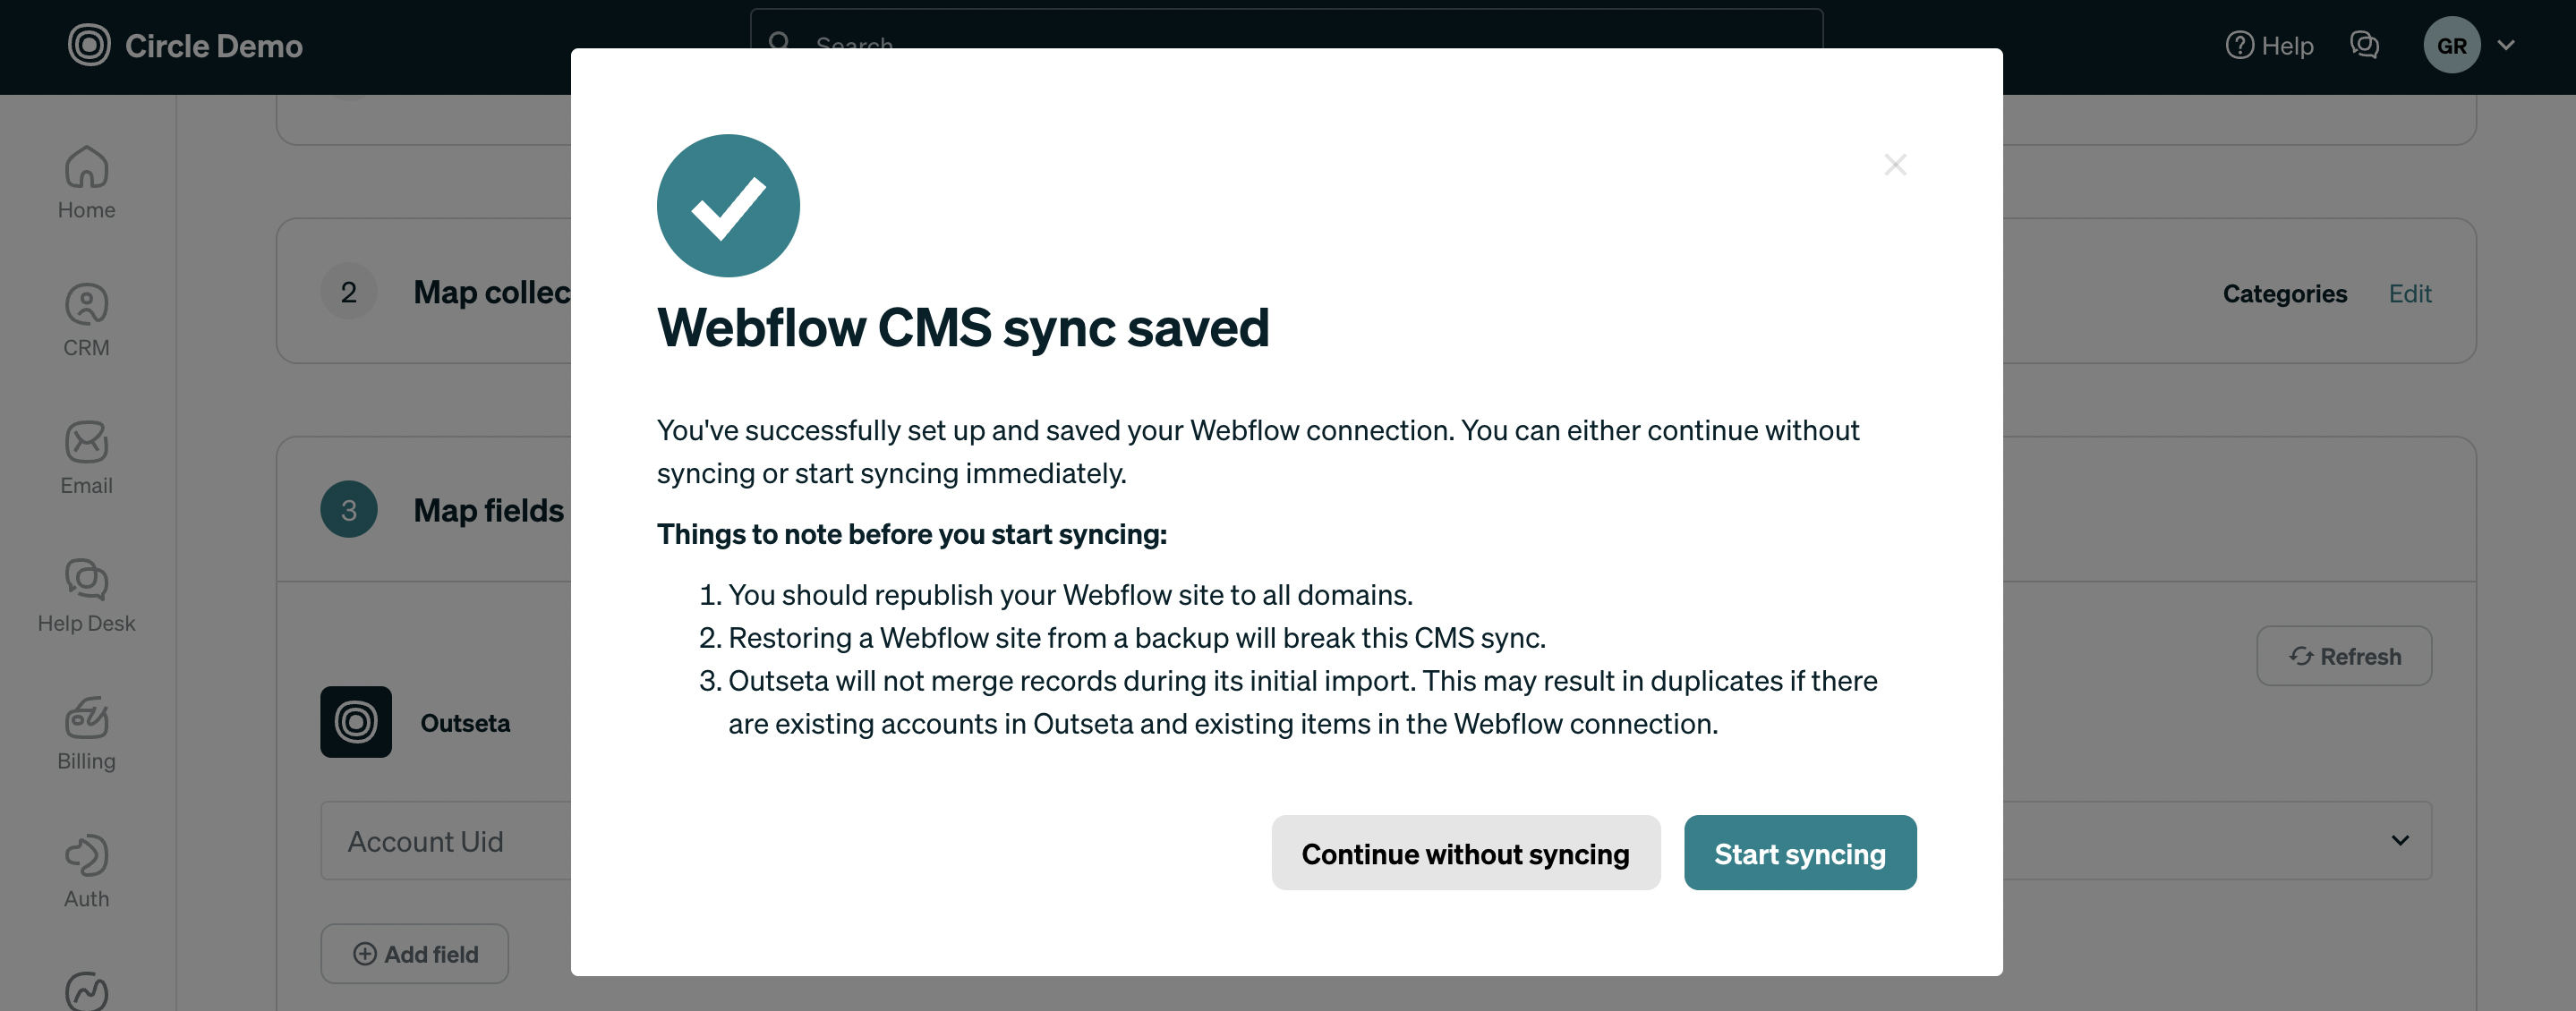
Click Next and then Start syncing.
That's it!
New account-specific pages will now be created as Webflow live CMS items and automatically published each time a member signs up via Outseta. And any time an account in Outseta is updated (i.e. when a user completes a new lesson) the sync integration will run and update the live CMS item again, always keeping data in sync between Outseta and Webflow.